Wednesday, January 26, 2011

Printmaking with Recycled Trays

I found that one of my third grade classes was attempting to recycle their 20 breakfast trays by making a mountain of them that overflowed into the hallway. 
I encouraged them to try stacking them up so they would take up much less room. 
I also started to take the rinsed and stacked trays to use for paint palettes. 
This inspired me to do a styrofoam tray recycling project with the third grade students.

We used the trays to make printing plates rather than the styrofoam sheets we often order. 
The students drew designs and pictures (no numbers or letters) on each section. 

The first printing task was to color each section with marker and print it on white paper. 
When they had printed all of their sections in colored marker I rolled black ink onto their plate and each student printed it on to the large brown paper to make a collaborative piece. 


Thursday, January 20, 2011

Sol Lewitt Painting Installation


 I introduced my third graders to the many works and many giant installations of Sol Lewitt.  What is so fantastic is if you have access to the internet you can show the students loads of time-lapse videos of the wall paintings being constructed! (My link goes to the Mass MOCA website but google it and you will find many more.)

The colors, lines, shapes, overlapping effects are all so wonderful for the students to make connections to and VTS exercises worked great with some of his wall painting examples.  

The project I am about to install began with each student drawing a line that touched two side of the paper, draw a parallel one to it and then fill it in with red crayon.  


The next class we used tempera cakes (red, blue, green, yellow) to paint concentric and contour lines.  

We will be installing them all up on the wall and connecting the red lines so as to create one giant piece where the red line travels through.  Stay tuned for more photos!


Weaving Characters


With limited time and the fact that I only have one of me and two hands I decided to change up and simplify my second grade weaving project this year.

I made a photocopy handout that had the "loom" on it for the students to cut.  Then we used 5-6  1.5" colored paper strips and glue sticks to create the weaving.  This size was more manageable since I travel around and have to hold on to them.


The second day when the students had finished their weaving they could turn their weaving into a character- most chose to do robots, some made some other people or aliens.  They are coming out really cute actually.  And to boot- my students seemed to grasp the weaving concept much stronger using the white paper and consistent size strips.

More photos of the finished products to come!!

I will most likely follow it up with the flower weaving project.

Monday, January 10, 2011

Winter Mittens!


Pairs of mittens!

These mittens have taken over my desk and school but they are adorable so I guess that's what matters. 
I have done this project before another way.  The media can be adapted a ton of ways. 
This year the first part of the project was a practice in careful watercolor painting.  
First the kids drew a few lines with white crayon (for  a little "magic" resist effect with the paint.)
The students painted wavy lines carefully across the paper ... 
without mixing colors or using black or brown. 
They all came out really nice.  I did another watercolor project the following week and the kids really applied their "careful painting" techniques!


During the next class the students did crayon texture rubbings on the back and cut out mittens.  I stapled yarn to them so they would be attached.  They are now hanging all around the school!


Sunday, January 9, 2011

Super Hero Figure Drawing


My fourth graders have recently reviewed portrait drawing with me.  I decided to review figure drawing as well.  I really try to encourage the students to investigate how the body works to create movements- how joints create the bends but bones can't bend.  To practice figure drawing I have them start by drawing a rectangle for the middle of the body and then attach circles for the joints and rectangles for the arm and leg bones.  This gets them to stop worrying about details and stay focused on the placement, alignment, and proportions of the body in different positions.  

This figure drawing practice was followed by a "design your own superhero" project.  The students had to create their character in a superhero pose and carefully draw and color both sides.  As a special surprise I hot glued capes to the figures with the students first initials on the back.  They look great in the case!


Friday, January 7, 2011

Cat and Mouse in the Snow

This lesson goes along with the cute winter story:
Cat and Mouse in the Snow by Tomek Bagacki

I read the story to my Kindergarten and First Grade classes. 
I then went over attributes of cat and mouse faces with the students. 
On grey construction paper the students drew a cat and mouse with pencil.  They could also add on a hat and scarf if they wanted.  The goal was to introduce them to zooming in or cropping a subject in their composition.  
They traced with a turquoise construction paper crayon.  Then they added snowflakes on with a white crayon.  This was especially cute when they drew a snowflake on the animal's nose or falling on to their face.  
During the next class we painted with watercolor. 


Monday, January 3, 2011

Fun Stand Up Buildings... for the little ones

Last but not least I thought I would add on one more architecture variation.
This was introduced the same as Crazy Architecture but was also a twist on Stand-Up City Bags.
I did this project with first graders at a museum class and they did a great job!


 This was my original sample for this lesson:

Architecture continued...

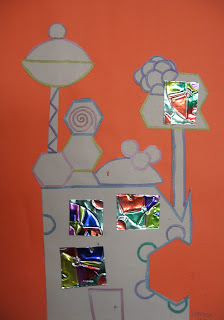
This was another version of the Crazy Architecture project.  In this variation we created the buildings out of paper cuts shapes and added details with metallic markers.  
We also created rotation symmetry designs influenced by stained glass rose windows on small pieces of metal.  The students used a circle for the start of this project.  They could cut them into a circle, cut them up, or keep them square.